Part 10: Layers II
We have already talked about the basics of the new layers technique. This lesson covers the following topics:
Clipping
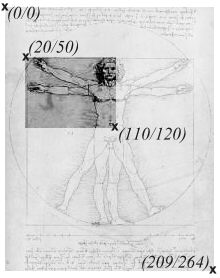
You can define which rectangular part of a layer will be visible. Everything outside this area won't be shown. This is called clipping. You can use the HTML-property clip like this:
<ilayer left=0 top=0 clip="20,50,110,120">
<img src="davinci.jpg" width=209 height=264>
</ilayer>
(I have added left=0 and top=0 as my Netscape version (PR3 on WinNT) seems to have some problems if these values are missing)
This part has got the size 90x70 (in pixel). The first two values specified through the clip-attribut (in the HTML-tag <layer> or <ilayer>) define the upper left corner of the clipping box. The next two values define the lower right corner. The following image illustrates this:
More interesting things can be achieved through setting the clipping region through JavaScript. For this you can change the properties clip.left, clip.top, clip.right and clip.bottom of the Layer-object. Just assign a new pixel value to one of these properties and the clipping region will change. The following example changes the clipping region dynamically. The user gets the impression that the image is being built up slowly:
<html>
<head>

<script language="JavaScript">
<!-- hide

var middleX, middleY, pos;


function start() {
  // get size of image
  var width= document.layers["imgLayer"].document.davinci.width;
  var height= document.layers["imgLayer"].document.davinci.height;

  // calculate pixel in the middle of image
  middleX= Math.round(width/2);
  middleY= Math.round(height/2);

  // starting position
  pos= 0;

  // start it!
  show();
}

function show() {

  // increase size of clipping area
  pos+= 2; // step size
  document.layers["imgLayer"].clip.left= middleX- pos;
  document.layers["imgLayer"].clip.top= middleY- pos;
  document.layers["imgLayer"].clip.right= middleX+ pos;
  document.layers["imgLayer"].clip.bottom= middleY+ pos;

  // check if the whole image has been displayed
  if (!((pos > middleX) && (pos > middleY)))
    setTimeout("show()", 20);

}

// -->
</script>
</head>

<body>

<ilayer name="imgLayer" clip="0,0,0,0">
<img name=davinci src="davinci.jpg" width=209 height=264>
</ilayer>

<form>
<input type=button value="Start" onClick="start()">
</form>

</body>
</html>
The button in the <body>-part calls the function start(). First
we have to calculate at which position we should start - this is the pixel in
the middle of the image. We store the x and y values of this pixel in the variables
middleX and middleY. Then the function show() is called.
This function sets the clipping region depending on the variables middleX,
middleY and pos. The variable pos is incremented everytime
the show() function is called. This means the clipping region gets bigger
every time. At the end of show() we set a timeout with
setTimeout() - like this the show() function is being called over
and over again. This process stops as soon as the whole image is being displayed.
  var width= document.layers["imgLayer"].document.davinci.width;
  var height= document.layers["imgLayer"].document.davinci.height;
Through document.layers["imgLayer"] we can access the layer called imgLayer. But why do we use document after document.layers["imgLayer"]? Well, every layer contains its own HTML-page - this means every layer has got a document-object. In order to access the image inside the layer imgLayer we need to access this document-object. You can see in the code that the image is called davinci. The rest should be clear.
We have already seen that a layer can contain several different objects.
They can even contain other layers. You might ask yourself what this might
be good for. There are several reasons for using nested layers. We will
have a look at some examples which demonstrate the use of nested layers.
The first example uses a layer (called parentLayer) which contains
two other layers (layer1 and layer2).
This is the parent layer
You can see three buttons. These buttons will start and stop the movement of the layers. You can see that moving the layer parentLayer also affects the other two layers. But moving the layer layer1 (or layer2) only affects this layer. This demonstrates that you can define groups of objects through nested layers.
Now let's have a look at the source code:
<html>
<head>

<script language="JavaScript">
<!-- hide

// starting position
var pos0= 0;
var pos1= -10;
var pos2= -10;

// moving?
var move0= true;
var move1= false;
var move2= false;

// direction?
var dir0= false;
var dir1= false;
var dir2= true;

function startStop(which) {
  if (which == 0) move0= !move0;
  if (which == 1) move1= !move1;
  if (which == 2) move2= !move2;
}

function move() {

  if (move0) {
    // move parentLayer
    if (dir0) pos0--
      else pos0++;

    if (pos0 < -100) dir0= false;

    if (pos0 > 100) dir0= true;

    document.layers["parentLayer"].left= 100 + pos0;
  }

  if (move1) {
    // move parentLayer
    if (dir1) pos1--
      else pos1++;

    if (pos1 < -20) dir1= false;

    if (pos1 > 20) dir1= true;

    document.layers["parentLayer"].layers["layer1"].top= 10 + pos1;
  }

  if (move2) {
    // move parentLayer
    if (dir2) pos2--
      else pos2++;

    if (pos2 < -20) dir2= false;

    if (pos2 > 20) dir2= true;

    document.layers["parentLayer"].layers["layer2"].top= 10 + pos2;
  }

}

// -->
</script>
</head>

<body onLoad="setInterval('move()', 20)">

<ilayer name=parentLayer left=100 top=0>
  <layer name=layer1 z-index=10 left=0 top=-10>
    This is the first layer
  </layer>

  <layer name=layer2 z-index=20 left=200 top=-10>
    This is the second layer
  </layer>

  <br><br>
  This is the parent layer

</ilayer>

<form>
<input type="button" value="Move/Stop parentLayer" onClick="startStop(0);">
<input type="button" value="Move/Stop layer1" onClick="startStop(1);">
<input type="button" value="Move/Stop layer2" onClick="startStop(2);">
</form>

</body>
</html>
You can see that we define two layers inside the parentLayer.
These are the nested layers. How do we access these layers through
JavaScript? You can see how this is done in the function move():
    document.layers["parentLayer"].left= 100 + pos0;
      ...
    document.layers["parentLayer"].layers["layer1"].top= 10 + pos1;
      ...
    document.layers["parentLayer"].layers["layer2"].top= 10 + pos2;
In order to access the nested layers you cannot just write
document.layers["layer1"] or document.layers["layer2"]
because the layers layer1 and layer2 are layers inside
parentLayer.
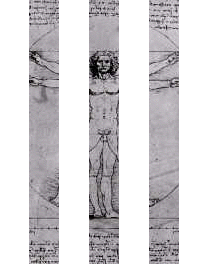
We have seen how to define a clipping region. The following example
uses a clipping region and a moving image. What we want to achive
is that the clipping region is fixed - i.e. it does not follow the
movement of the image.
Push this button in order to load the example:
Here is the source code:
<html>
<head>

<script language="JavaScript">
<!-- hide

var pos= 0; // starting position
var direction= false;

function moveNclip() {

  if (pos<-180) direction= true;
  if (pos>40) direction= false;

  if (direction) pos+= 2
    else pos-= 2;

  document.layers["clippingLayer"].layers["imgLayer"].top= 100 + pos;

}

// -->
</script>

</head>
<body onLoad="setInterval('moveNclip()', 20);">

<ilayer name="clippingLayer" z-index=0 clip="20,100,200,160" top=0 left=0>
  <ilayer name="imgLayer" top=0 left=0>
  <img name=davinci src="davinci.jpg" width=209 height=264>
  </ilayer>
</ilayer>

</body>
</html>
Again you can see how we have to access the nested layer:
document.layers["clippingLayer"].layers["imgLayer"].top= 100 + pos;You should be familiar with all the other elements in this script.
Effects with transparent layers
Interesting effects can be created with the help of (partial) transparent
layers. Especially images with transparent parts can create a cool effect.
Not all image formats can handle transparent parts. At the moment the
best format to use is gif89a. The most of the new graphic programs support
this gif-format. There are also some freeware tools available on the net.
The new image-format PNG supports transparent parts as well. I think we will see
many pages using this format in the near future (as soon as the most browsers
support it). It has got many advantages in comparison to the gif-format.
Let's have a look at the effect:
This example uses these two images (I have added a background color so that you can see the transparent parts):
|
|
The script does not differ very much from the other examples - so I won't print it here (of course you can see the code through choosing 'View document source' in your browser).
Many cool effects which can be found on the net are based on layers with transparent parts. You can find some further examples on my JavaScript example page (which is part of the homepage of my JavaScript book at http://www.dpunkt.de/javascript/) - this page is available in english or german.
I hope you've got a basic understanding of using layers with the help of this tutorial. So I am looking forward to seeing some really cool JavaScript effects...
©1996,1997 by Stefan Koch
e-mail:skoch@rumms.uni-mannheim.de
http://rummelplatz.uni-mannheim.de/~skoch/
My JavaScript-book